Primer bulbs are affordable and easy to replace. However, if you invest 20-25 minutes and only $5-10, you can avoid buying a new bulb.
So, how to do a primer bulb temporary fix properly?
First, you’ve to detach the bottom plate and remove the old primer bulb from the carburetor. When done, insert the rubber tip with a finger and measure it properly. Now, cut around the rubber tip using a scissor. Lastly, push the tip back in and glue it.
However, there’s more to discuss and explain. Stay with us if you wish to know more information.
A Walkthrough For Fixing Primer Bulbs In 5 Steps
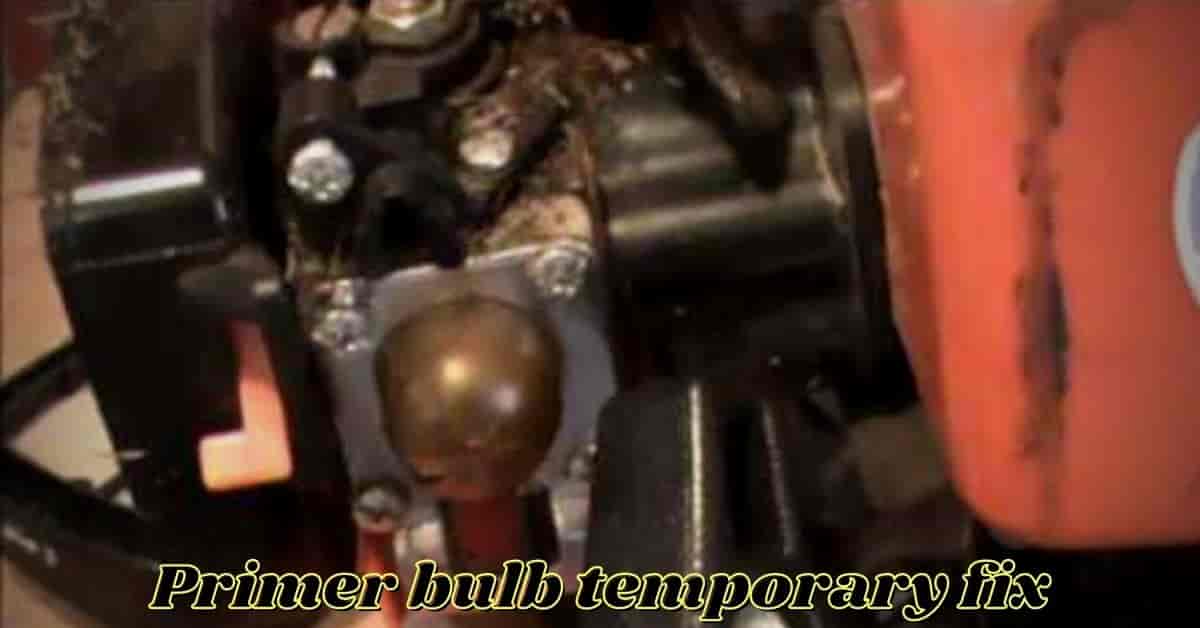
A primer bulb is an essential component in your engine. It’s located near the fuel line between the engine and a gas tank.
A primer bulb functions all the time to ensure proper gasoline flow in the carburetor. However, it can malfunction at times.
This temporary fix will get rid of all the problems and last up to a year. This is much cheaper than getting a new bulb.
So, we advise you to focus on each step at a time. Here’s how you can fix your primer bulb effortlessly –
Gather the Necessary Tools
First, we’ve to manage some tools that we’re going to use in this DIY. Don’t worry though! All of these tools are cheap and very easy to get!
Here, we’ve listed all the tools you’ll require –
- Rubber Finger Tips
- Superglue
- A screwdriver
- Scissors/Razor Blades
- A plier
- A Dremel tool (Optional)
Get these tools as soon as possible and we can get started!
Step 1: Remove the Old Bulb From the Carburetor
To get the primer bulb out, you’ve to open up the carburetor first. Although it may seem a little hard, it’s not impossible.
First, detach the fuel line from the carburetor. When done, disconnect the choke and throttle cables.
Now, safely detach the carburetor and get prepared to open up the carburetor. We advise taking a note or some pictures to keep everything in order.
Because this part is very sensitive and requires precision.
Now, carefully unscrew all 4 screws and get the plate out. When done, grab the old bulb from the plate. Try to pull it upwards. A plier can also be used if it isn’t coming off.
After that, clean the plate if it’s dirty. Make sure there aren’t any rubber particles from the old bulb.
Step 2: Take Measurements of the Rubber Tip
It’s time to get some measurements of the tip. So, get ready!
First, get the rubber fingertip and push it inside through the hole. Stop when it feels tightened enough.
Make sure the plate is even around the tip. You can use the nipples to make sure it has lined up properly.
For an accurate result, count how many rows of nipples went through the hole. It’s usually 4-5 rows in most cases. After that, take the fingertip out.
Now, get the scissor and cut the fingertip one row above what rows you’ve counted.
For example, if you counted 5 rows of nipples, cut the fingertip between the 4th and 5th row.
Step 3: Glue the Rubber Tip
After completing the previous tip, you now have a rubber tip exactly like a primer bulb. Now we’re going to glue the rubber tip from the inside.
So, get the plate and put the fingertip back into it. Try to leave as little of the tip as you can inside the plate. When done right, it’ll snug onto the plate automatically.
There’s almost no gap between the carburetor surface and the metal plate. So, if there’s a little tip inside the hole, the plate won’t sit on the carburetor.
Therefore, double-check it by putting the plate on the carburetor with the tip on.
Once it sits right with the tip on, you can proceed to glue the tip. Glue the inside properly and make sure there’s no leak.
Ensure that the glue is holding the tip from inside. When completed, let it dry out.
Step 4: Smoothen the Edges With a Scissor or a Dremel Tool
After it’s completely dry, take some scissors or blades and cut off any pointy particles.
If you have a Dremel tool, we can go a little bit further. Use the tool to grind off any excess fingertip and glue.
Normal scissors or blades are enough to do this as well. Make sure to smoothen the metal plate properly otherwise, it won’t sit.
If you can’t put back all the screws, take it off. Keep smoothing it out until you can put the plate back.
Step 5: Reassemble the Carburetor and Double-Check It
It’s time to reattach all the parts back to the carburetor. If you have taken any notes, use them to put them all back together.
Screw all 4 screws tightly to avoid any gas leak. Connect the throttle linkage again and reattach the fuel line.
With that, you now have a working primer bulb again. Be sure to congratulate yourself because you’ve done a great job!
If this procedure seems complex or too bothersome; you can always get a new one.
To save you some time, we’ve included some of our recommended picks –
Get whichever you like and that’ll fix your problem instantly.
Frequently Asked Questions
Question: Can I bypass the primer bulb?
Answer: A short answer is no. A primer bulb ensures the amount of gas/fuel flow to the carburetor. Without this component, the carburetor will fail.
Question: Should the primer bulb have a hole in it?
Answer: The primer should never have a hole in it. It’ll cause a gas or fuel leak and it’s not good for the engine. If you see a hole, get it replaced immediately.
Question: Why is there a primer bulb on small engines?
Answer: The rubber tip of the primer bulb works as a switch. When it gets pressed, it draws gas/fuel and supplies it to the carburetor.
Wrapping Up
That was everything we could gather on the primer bulb temporary fix. If done properly, this will fix your problem for a long time.
If you have any questions in this regard, don’t hesitate to ask us. Use the comment box below and share your insights.
Finally, good luck!

- Are Phlox Deer Resistant? (Answer Revealed) - December 16, 2023
- 6 Ways to Bypass Primer Bulb on Weedeater (What to Do) - November 2, 2023
- Why Won’t My Peppers Turn Red [All Reasons & Solutions] - October 24, 2023